Introduction
What is GraphQL and why is it important?
Before we dive into testing GraphQL using Postman, let’s first answer this basic question. GraphQL is a powerful query language and runtime for APIs, which was developed by Facebook in 2012 and later open-sourced in 2015. It allows clients to request exactly the data they need, making it a flexible and efficient alternative to traditional REST APIs. GraphQL has gained significant popularity due to its ability to:
- Minimize over-fetching and under-fetching of data
- Combine multiple API calls into a single request
- Enable real-time updates with subscriptions
- Provide a strongly typed schema for better predictability
To learn more about GraphQL and how it compares to other API types, check out our comprehensive guide on testing REST, SOAP, and GraphQL APIs.
The need for testing GraphQL APIs
Just like any other API, it’s crucial to thoroughly test GraphQL APIs to ensure they function as expected and provide accurate data. By testing your GraphQL APIs, you can:
- Validate the correctness and reliability of your API
- Identify performance bottlenecks and optimize the API
- Ensure security and prevent unauthorized access
- Enhance the user experience by reducing errors and latency
For a deeper understanding of API testing and its benefits, explore our beginner’s guide to API testing and the advantages of automated API testing.
Overview of Postman as a testing tool
Postman is a widely used, feature-rich tool for API testing and development. It simplifies API testing by providing a user-friendly interface for creating, sending, and analyzing HTTP requests. With Postman, you can:
- Design, test, and document APIs in a single platform
- Collaborate with your team using shared workspaces and collections
- Automate tests with pre-built scripts and integrations
- Monitor API performance and establish baselines
To get started with Postman and API test automation, dive into our comprehensive Postman tutorial.
In this guide, we’ll cover everything you need to know about testing GraphQL APIs with Postman, from setting up your environment to advanced techniques and best practices. So let’s dive in and master the art of GraphQL testing with Postman!
Setting Up Your Environment
Before diving into testing GraphQL APIs with Postman, you’ll need to set up your environment properly. In this section, we’ll cover the essential steps, including installing Postman, creating a new workspace, and importing a GraphQL schema.
Installing Postman
To get started with Postman, you’ll need to download and install it on your computer. Follow these simple steps:
- Visit the official Postman website.
- Choose the appropriate version for your operating system (Windows, macOS, or Linux).
- Download the installer and run it to install Postman.
For detailed installation instructions, refer to our comprehensive Postman tutorial.
Creating a new workspace in Postman
Workspaces in Postman allow you to organize and collaborate on your API testing projects. To create a new workspace:
- Launch Postman and sign in to your account.
- Click on the workspace dropdown located in the top-left corner.
- Select “Create New” and choose “Workspace”.
- Enter a name and description for your workspace.
- Choose whether the workspace should be personal or part of a team.
- Click “Create Workspace”.
Now that you’ve created a new workspace, you can begin testing your GraphQL APIs in an organized environment. To learn more about workspaces and their benefits, check out our skyrocket your end-to-end API testing skills with Postman guide.
Importing a GraphQL schema
A GraphQL schema defines the data types, queries, mutations, and subscriptions that your API supports. Importing a schema into Postman enables you to access the API’s documentation and autocomplete features. To import a GraphQL schema:
- Open your new Postman workspace.
- Click the “APIs” tab in the left sidebar. (If API is not an option, select ‘Add elements to Sidebar’ from the sidebar and enable ‘APIs’ under ‘Configure Sidebar’.
- Click the “New API” button.
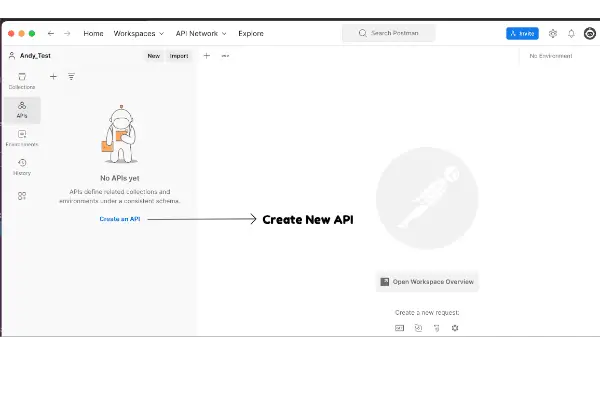
- Enter a name and version for your API.
- Select “GraphQL” as the API schema type.
- Click “Create API”.
- In the API overview, select the “Definition” tab and create a new definition.
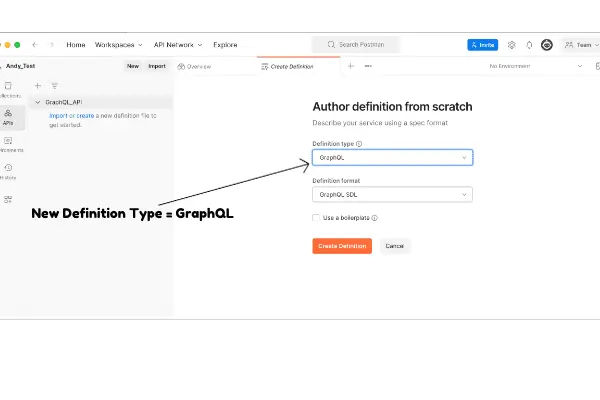
- Choose the preferred method to import your schema. You can import it from a file, URL, or paste the schema directly.
- Click “Save”.
Now that you’ve imported your GraphQL schema, you’re all set to start testing your API using Postman. For a detailed explanation of GraphQL schemas and their role in API development, explore our GraphQL basics for beginners article.
With your environment set up, you’re ready to dive into the world of GraphQL testing with Postman. In the following sections, we’ll cover everything from configuring Postman for GraphQL testing to advanced techniques and best practices.
Understanding GraphQL Queries, Mutations, and Subscriptions
To effectively test a GraphQL API, it’s crucial to understand the three primary operation types: queries, mutations, and subscriptions. In this section, we’ll delve into each operation type, their purposes, and how they help facilitate efficient and flexible communication between clients and servers.
Query: Fetching data from the API
Queries are the cornerstone of GraphQL and are used to request data from the API. They enable clients to fetch precisely the data they need by specifying the fields they want to retrieve. This eliminates over-fetching and under-fetching, resulting in efficient and tailored data transfer.
Here’s a simple example of a GraphQL query:
query {
  user(id: "1") {
    name
    email
    posts {
      title
      content
    }
  }
}
This query requests the name, email, and posts (including the title and content) of a user with the ID “1.” By specifying the fields, the client only receives the data it requires, reducing bandwidth usage and improving performance.
Mutation: Modifying data in the API
Mutations are responsible for modifying data in a GraphQL API. They allow clients to create, update, or delete data, ensuring that the API remains flexible and accommodating to changes in the client’s requirements.
Here’s an example of a GraphQL mutation that creates a new user:
mutation {
  createUser(input: { name: "John Doe", email: "john.doe@example.com" }) {
    id
    name
    email
  }
}
In this mutation, we create a new user with a specified name and email. After creating the user, the API returns the newly created user’s ID, name, and email.
Subscription: Real-time updates with GraphQL
Subscriptions bring real-time functionality to GraphQL APIs, allowing clients to receive updates when specific events occur. This is particularly useful for applications that require real-time data updates, such as chat applications or live dashboards.
Here’s an example of a GraphQL subscription that listens for new user creation events:
subscription {
  newUser {
    id
    name
    email
  }
}
With this subscription, the client receives real-time updates when a new user is created. The update includes the new user’s ID, name, and email.
By understanding GraphQL queries, mutations, and subscriptions, you can effectively test and interact with GraphQL APIs, ensuring that they meet your application’s requirements and provide a seamless user experience. In the following sections, we’ll explore how to use Postman to test these different operation types and validate your GraphQL API’s functionality.
Configuring Postman to Test GraphQL APIs
Postman is a popular and versatile tool for API testing, and it’s no exception when it comes to testing GraphQL APIs. In this section, we’ll walk you through setting up an environment in Postman, configuring API requests, and using variables and dynamic data in your queries.
Setting up an environment in Postman
An environment in Postman allows you to store and manage variables specific to your API testing needs. Follow these steps to create a new environment:
- Open Postman and click on the Manage Environments button (gear icon) in the top right corner.
- Click on Add to create a new environment.
- Name your environment, e.g., “GraphQL API Testing.”
- Add variables, such as
base_urlfor the API endpoint you’ll be testing. - Click Add to save your environment.
Now you can use these variables in your requests, making your tests more dynamic and easy to maintain.
Configuring the API request
With your environment set up, you can now configure a request to test your GraphQL API. Follow these steps:
- Click the + button to create a new request tab.
- Set the request method to POST.
- In the address bar, enter
{{base_url}}/graphqlto use thebase_urlvariable from your environment. - Click on the Headers tab and add a new header with the key
Content-Typeand valueapplication/json. - Switch to the Body tab and select the raw option.
- Paste your GraphQL query, mutation, or subscription in the request body, formatted as a JSON object with a key
queryand the GraphQL string as its value. For example:
{
  "query": "query { user(id: \"1\") { name, email } }"
}
- Click Send to execute the request.
If everything is configured correctly, you should receive a JSON response with the requested data or any errors that occurred during the request.
Using variables and dynamic data in your queries
Postman allows you to use variables and dynamic data in your queries, making your tests more flexible and maintainable. To leverage this feature:
- Define variables in your environment, as shown in the previous section.
- Use double curly braces
{{variable_name}}to reference variables in your request URL, headers, or body. For example, you could use{{user_id}}in your query:
{
  "query": "query { user(id: \"{{user_id}}\") { name, email } }"
}- You can also use dynamic data by leveraging Postman’s built-in scripting features, such as the Pre-request Script and Tests tabs. These scripts allow you to generate and manipulate data before sending a request or validating the response.
For example, in the Pre-request Script tab, you could generate a random email and set it as a variable:
pm.variables.set("email", "testuser" + Math.floor(Math.random() * 1000) + "@example.com");Then, in the request body, use the {{email}} variable in a mutation to create a new user:
{
  "query": "mutation { createUser(input: { name: \"John Doe\", email: \"{{email}}\" }) { id, name, email } }"
}
By following these steps, you can create dynamic, maintainable, and efficient tests for your GraphQL APIs. As you continue testing, be sure to explore Postman’s extensive features, such as automated testing, test design best practices, and test coverage optimization. Also, make sure to familiarize yourself with the differences between testing REST, SOAP, and GraphQL APIs to better understand the unique challenges and advantages of GraphQL.
Leveraging Postman’s capabilities can help you ensure the reliability, security, and performance of your GraphQL APIs. By taking advantage of Postman’s powerful features, you can create effective, maintainable, and dynamic tests that ensure the quality of your GraphQL APIs.
Performing CRUD Operations with GraphQL and Postman
In this section, we will dive into CRUD operations using GraphQL and Postman. CRUD stands for Create, Read, Update, and Delete—the essential operations you need to manage data in any API. With GraphQL, you perform these operations using mutations and queries. Let’s explore how to create, read, update, and delete data using GraphQL and Postman.
Creating data (Mutation)
To create new data, you’ll use a mutation. Mutations allow you to modify the data stored in your API. To create new data, simply define a mutation in your GraphQL schema and send it as a request via Postman.
- In Postman, open a new request and set the request type to POST.
- Enter the GraphQL API endpoint URL in the address bar.
- In the Body tab, select GraphQL.
- Write the mutation in the Query section, specifying the data you want to create:
mutation {
  createPost(input: {title: "New Post", content: "This is a new post!"}) {
    id
    title
    content
  }
}
- Click Send. If successful, you’ll receive a response containing the newly created data.
Reading data (Query)
To fetch data from your API, you’ll use a query. Queries allow you to request specific data from the API without modifying it. To read data, define a query in your GraphQL schema and send it as a request via Postman.
- In Postman, open a new request and set the request type to POST.
- Enter the GraphQL API endpoint URL in the address bar.
- In the Body tab, select GraphQL.
- Write the query in the Query section, specifying the data you want to fetch:
query {
  post(id: 1) {
    id
    title
    content
  }
}
- Click Send. The response will contain the requested data.
Updating data (Mutation)
To update existing data, you’ll use a mutation. Like creating data, updating data requires you to define a mutation in your GraphQL schema and send it as a request via Postman.
- In Postman, open a new request and set the request type to POST.
- Enter the GraphQL API endpoint URL in the address bar.
- In the Body tab, select GraphQL.
- Write the mutation in the Query section, specifying the data you want to update:
mutation {
  updatePost(id: 1, input: {title: "Updated Post", content: "This post has been updated!"}) {
    id
    title
    content
  }
}
- Click Send. The response will contain the updated data.
Deleting data (Mutation)
Finally, to delete data, you’ll use another mutation. Deleting data in GraphQL is similar to creating and updating data, as it also requires defining a mutation in your schema and sending it as a request via Postman.
- In Postman, open a new request and set the request type to POST.
- Enter the GraphQL API endpoint URL in the address bar.
- In the Body tab, select GraphQL.
- Write the mutation in the Query section, specifying the data you want to delete:
mutation {
  deletePost(id: 1) {
    id
  }
}
- Click Send. The response will confirm the successful deletion of the data by returning the deleted item’s ID.
By following the steps outlined above for each CRUD operation, you can effectively manage your data using GraphQL and Postman. Keep in mind that the exact syntax for your mutations and queries may vary depending on your GraphQL schema and API requirements. Make sure to consult your API documentation and adjust the examples provided accordingly.
Advanced GraphQL Testing Techniques with Postman
Now that you have a good understanding of the basics, it’s time to dive into some advanced GraphQL testing techniques with Postman. In this section, we’ll cover testing nested queries and relationships, validating response schema, and automating tests with Postman scripts. Let’s get started!
Testing Nested Queries and Relationships
One of the strengths of GraphQL is its ability to handle complex queries and relationships between data objects. To test these nested queries effectively, you’ll need to:
- Understand the relationships between objects in your GraphQL schema. Familiarize yourself with the schema and its relationships to craft meaningful queries.
- Write complex queries that retrieve related data objects. For example, you might query for an author’s books and their reviews, all in a single request.
- Validate the response data to ensure the relationships are represented correctly and the data is accurate.
An example of a nested query might look like:
query {
  author(id: 1) {
    name
    books {
      title
      reviews {
        rating
        comment
      }
    }
  }
}
Validating Response Schema
Ensuring that your API responses adhere to the expected schema is crucial for maintaining data integrity and API reliability. To validate the response schema in Postman:
- Create a JSON schema that represents the expected structure of the API response. You can use tools like JSON Schema to help create a schema for your data.
- Use Postman’s built-in schema validation by adding a test script that checks the response against the schema. You can use the
tv4library included with Postman to perform the validation.
Here’s an example of a test script that validates a response against a JSON schema:
const schema = {
  // Your JSON schema here
};

const data = pm.response.json();
const validationResult = tv4.validateResult(data, schema);

pm.test('Response schema is valid', () => {
  pm.expect(validationResult.valid).to.be.true;
});
Automating Tests with Postman Scripts
Postman offers powerful scripting capabilities that let you automate your API testing. With Postman scripts, you can write JavaScript code to perform a wide range of tasks, from setting up test data to validating responses and generating test reports.
To automate your GraphQL tests in Postman:
- Write test scripts in the “Tests” tab of your Postman request. You can use the
pmobject to interact with the request, response, and environment data. - Leverage built-in test functions like
pm.test()andpm.expect()to write assertions and validate your API’s behavior. - Run your tests by sending requests and reviewing the test results in the “Test Results” tab. You can also use Postman’s Newman command-line tool to run tests in your CI/CD pipeline or as part of your automated test suite.
For example, you can create a script to test that a GraphQL query returns the correct number of items:
const response = pm.response.json();
const expectedItemCount = 3;

pm.test('Query returns the correct number of items', () => {
  pm.expect(response.data.items.length).to.equal(expectedItemCount);
});
By mastering these advanced GraphQL testing techniques, you’ll be well-equipped to tackle even the most complex APIs and ensure their reliability, performance, and security. Keep honing your skills and exploring new testing strategies with resources like testing REST vs SOAP vs GraphQL APIs and effective API test design. Remember, the key to successful API testing is continuous learning and improvement!
Postman Collections and Collaboration
Organizing tests with collections
Postman collections are a powerful way to keep your API tests organized and easily accessible. To create a collection, follow these steps:
- Open Postman and click on the “Collections” tab on the left side of the interface.
- Click the “New Collection” button, give your collection a name, and provide an optional description.
- Click “Create” to finish creating your new collection.
You can now add requests to your collection by following these steps:
- Click the “+” icon next to the “Tabs” section to create a new request.
- Configure your request (e.g., by setting the HTTP method, entering the URL, and providing any required headers or body data).
- Click the “Save” button to open the “Save Request” dialog.
- Select your collection from the “Choose a collection or folder” dropdown menu, provide a name for your request, and click “Save to [Your Collection Name]”.
You can also create folders within your collections to further categorize your tests based on functionality or API endpoints. To create a folder:
- Right-click on your collection in the “Collections” tab and select “Add Folder.”
- Give your folder a name and an optional description, then click “Create.”
By organizing your tests with collections, you can streamline your workflow and make it easier to manage related requests.
Sharing and collaborating on tests with your team
Sharing and collaborating on tests with your team is made easy with Postman’s collaboration features. To share a collection with your team:
- Click on the “ellipsis (…)” icon next to the collection name in the “Collections” tab.
- Select “Share collection” from the dropdown menu.
- Choose the workspace you want to share the collection with, or invite new members by entering their email addresses in the “Invite people” field.
- Click “Share” to complete the sharing process.
By sharing collections, you provide your team members access to the latest tests and facilitate a smooth and efficient collaborative testing environment.
Integrating Postman into Your CI/CD Pipeline
Running tests from the command line with Newman
To run your Postman tests from the command line, you can use Newman. To get started, follow these steps:
- Install Newman globally by running the following command in your terminal or command
npm install -g newman - Export your Postman collection as a JSON file:
- In Postman, click on the “ellipsis (…)” icon next to the collection name in the “Collections” tab.
- Select “Export” from the dropdown menu.
- Choose the export format (e.g., “Collection v2.1”) and click “Export.”
- Save the JSON file to your desired location.
- Run your collection using Newman by executing the following command:
newman run path/to/your/collection.json
Newman will execute your collection and provide a summary of the test results.
Integrating tests into your CI/CD pipeline
To integrate your Postman tests into your CI/CD pipeline, you can follow these general steps:
- Set up a build environment that includes Node.js and npm.
- Install Newman as a dependency for your project:
npm install newman --save-dev - Add a script to your project’s
package.jsonfile to run your Postman collection with Newman:"scripts": {
"test": "newman run path/to/your/collection.json"
} - Configure your CI/CD pipeline to execute the test script during the build or deployment process. Depending on the CI/CD tool you’re using (e.g., Jenkins, Travis CI, GitLab CI), the configuration process will vary. Here’s an example of a
.gitlab-ci.ymlconfiguration file for GitLab CI:stages:- test
api_tests:
stage: test
image: node:latest
before_script:
- npm install
script:
- npm test
We have script examples of integrating Postman with all common CI/CD pipeline in the article on using Postman for End to End testing. This integration helps your team catch potential issues earlier and promotes a more stable and reliable API development process.
Monitoring GraphQL APIs with Postman
Monitoring your GraphQL APIs is a crucial aspect of maintaining the performance and reliability of your services. Postman allows you to set up monitors for your API tests, track their results, and analyze performance metrics to ensure that your APIs continue to meet the expectations of your users. In this section, we’ll discuss how to set up monitors for your GraphQL API tests and analyze the results to identify potential issues and improvements.
Setting up monitors for your API tests
Postman monitors enable you to run your API tests on a predefined schedule, allowing you to automatically track the performance, uptime, and functionality of your APIs. To set up a monitor for your GraphQL API tests, follow these steps:
- Create a Postman Collection containing your GraphQL API tests. This collection will be used by the monitor to run your tests periodically. Ensure that your tests cover the essential functionality and performance aspects of your GraphQL API.
- Click on the “Monitors” tab in Postman’s main navigation bar. This will open the Monitors page, where you can see all of your existing monitors and create new ones.
- Click the “Create a monitor” button to open the “Create Monitor” dialog. Here, you’ll configure the details of your new monitor.
- Enter a name for your monitor that clearly describes its purpose, such as “GraphQL API Performance Monitor”.
- Select the collection containing your GraphQL API tests from the “Collection” dropdown menu.
- Configure the monitor’s schedule by selecting a predefined interval (e.g., every 15 minutes, every hour, every day) or creating a custom schedule using the advanced options. Ensure that the schedule aligns with your monitoring needs and expectations.
- Configure any additional settings, such as notification preferences and environment variables, as needed.
- Click “Create” to create your monitor. Postman will now run your GraphQL API tests on the specified schedule and track their results.
Analyzing test results and performance metrics
Once your monitor is set up and running, you can analyze the test results and performance metrics to gain insights into the health and performance of your GraphQL API. To view the results of your monitor, follow these steps:
- Navigate to the “Monitors” tab in Postman’s main navigation bar. This will open the Monitors page, where you can see all of your existing monitors.
- Click on the name of your monitor to open its details page. This page will display an overview of your monitor’s status, as well as a history of its test runs.
- Review the test run history to identify any patterns, trends, or issues in your GraphQL API’s performance and functionality. Pay particular attention to any failed test runs, as these may indicate potential problems with your API.
- Click on a specific test run to view its detailed results, including individual test outcomes, response times, and any errors or warnings. Use this information to identify specific areas of your API that may require further investigation or optimization.
By setting up monitors for your GraphQL API tests and analyzing the results, you can proactively identify potential issues and areas for improvement. This will help you maintain a high-quality API that consistently meets the needs and expectations of your users.
Conclusion
As we reach the end of this comprehensive guide, let’s recap the key takeaways and discuss some further resources to help you master GraphQL testing with Postman.
Key takeaways
- Understand the benefits of GraphQL: GraphQL offers numerous advantages over traditional REST APIs, such as improved performance, flexibility, and reduced data over-fetching. By leveraging GraphQL, you can build more efficient and scalable APIs that better meet the needs of your users.
- Use Postman for GraphQL testing: Postman is a powerful and versatile tool for API testing that supports GraphQL queries and mutations. With Postman, you can perform CRUD operations, test nested queries and relationships, and validate response schemas.
- Implement advanced testing techniques: To thoroughly test your GraphQL APIs, use advanced techniques such as automating tests with Postman scripts, monitoring API performance, and integrating Postman into your CI/CD pipeline.
- Collaborate with your team: Postman enables you to organize your tests into collections and share them with your team members, facilitating collaboration and ensuring that everyone is on the same page when it comes to API testing.
Further resources for mastering GraphQL testing with Postman
To continue expanding your knowledge of GraphQL testing with Postman, we recommend exploring the following resources:
- The Comprehensive Postman Tutorial for API Test Automation: Dive deeper into Postman’s features and learn how to automate your API testing process effectively.
- Testing REST vs. SOAP vs. GraphQL APIs: Comprehensive Guide: Understand the differences between REST, SOAP, and GraphQL APIs and learn the best practices for testing each type.
- GraphQL Basics for Beginners: What Is It and Why to Use It: Familiarize yourself with the fundamentals of GraphQL and learn why it is becoming the go-to choice for many developers.
- The official GraphQL documentation: Gain a deeper understanding of the GraphQL specification, best practices, and real-world use cases.
By exploring these resources and putting the concepts discussed in this guide into practice, you’ll be well on your way to mastering GraphQL testing with Postman and ensuring the reliability, performance, and scalability of your APIs.